Sunday, June 30, 2013

HDR Photography


HDR image of Disney Characters

HDR stands for High Dynamic Range and is a process used in producing an image that overcomes the limitations of today's digital cameras. It is not a new process. It was actually used as early
as the 1850s by a photographer called Gustave Le Gray.

It can be used during those times when the camera is not able to capture the full range of contrast in a scene. When taking pictures of a scene with a great dynamic range it is not possible to
correctly expose for both the highlights and the shadows. The problem is that if you expose for the highlights, the shadows will lose all the information as you might only see black and will add noise. If you expose for the shadows, your highlights will be burn out and you will lose information
as you might only see white.

What if instead you take multiple pictures, exposing for both highlights and shadows and merge them together? That is what HDR accomplishes. Through the use of software, HDR exposes for both highlights and shadows in a single image.

Cameras can only see and capture about 5-7 exposure values. Our human eyes can capture about 12. With HDR you can make your images look the way the scene looked when you were exposing the picture. Anyone can apply this process to their images. Keep in mind that you will still need to start this process with a good image. This is not a process for making bad images look good. A bad image is still a bad image but it can make a good image look its best.

HDR images are usually composed of three images. One at normal exposure (EV 0), one underexposed (usually at EV-2) and one overexposed (usually at EV+2). Some photographers take at many as 5 to 7 pictures with different exposure values. I find that most of the time this is not needed.
Below are the the three exposure images used to merge the HDR file at the beginning of the blog entry.
Images used to merge Disney Character image.

The  Equipment You Will Need


To capture true HDR images you will need the following equipment. Later on I will show you a way to cheat and create HDR images with only one picture.

1. Camera - While any camera will work it would be easiest if it allowed you to shoot in manual mode and can also be set to use exposure bracketing.
2. Tripod - You want to capture multiple images of the same scene, therefore the use of a tripod is a must.
3. Cable release or remote - You want to avoid camera shake. Using a shutter cable release or remote will be best. If you don't have a cable release you can use your camera's timer.
HDR image of old horse cart


How To Shoot Your Picture

STEP 1: If your camera allows it, set your camera to exposure bracketing. The camera will adjust the 3 exposure values for you. I normally set this to EV+2 and EV-2. If it does not, you will have to take the three pictures and manually compensate for the EV+2, Normal and EV-2 values.

STEP 2: Use the lowest ISO possible. The idea is that you want to try to minimize noise and since you will be using a tripod you don't need a high ISO. I normally set my to 100.

STEP 3: Use aperture priority (Av or A) mode.

STEP 4: Turn off auto focus. Auto focus has a gyro inside that is going to vibrate. The less vibration you have in your camera the better the images quality when merging together.

STEP 5: Turn off image stabilization. Since you are using the tripod this is not needed. In fact, having it on might increase vibrations.

STEP 6: Shoot in RAW mode. This will capture the most information in every image.

STEP 7: Shoot at aperture f/8. If you can, shoot at this aperture value to get a very sharp photograph. Most lenses will be sharpest at this aperture setting.
 HDR image of sponge shop entrance

What To Shoot

- Shoot during the golden hour. That time during sunrise and sunset where the light is warmer.
- Another possibility is to shoot at night.
- Shoot objects with a lot of textures.

HDR image of wood cabin
  
What Software To Use

Here is a list of the most popular software products used to create a HDR image.
- Photomatix Pro 4 - one of the most used software for creating HDR images at under $100.
- HDR Efex Pro - Another highly used software.
- Adobe Photoshop CS6 - I think this is a great software for HDR images. It really makes it look like no effect was added to the image. This is the last version that will come in a CD as now you will need to purchase an Adobe Creative Cloud membership. You can find more information about it here www.adobe.com/products/photoshop.html.
- Adobe Photoshop Elements 11 - Same as Photoshop but without all the bells and whistles at a much lower price at under $65.00.
- Topaz Adjust - you can use this software to create psedo HDR images, where only one image is used.

HDR image of sail boats

Cool Trick for Creating HDR Effect

If I want to create an HDR image and I did not shoot bracketed images, I will create the additional images in Adobe Lightroom. With Lightroom, I will select the image I want and save it and then overexpose it by +2 and underexpose it by -2 and save both of those images as well. Now I have 3 images with different exposure values to create my HDR.

The Topaz software mentioned above does the same thing automatically. You simple select the image you want to use and it will automatically convert it to HDR. That is why it is called psedo HDR.

HDR images of pelicans

Here is a picture where I had to create the overexposed and underexposed images because the darn pelicans would not stand still, no matter how many times I told them not to move.

Obviously there will be times like these where your subjects will be moving and you will not be able to capture three images that are alike. You may see this if you are capturing an image of a tree for instance. Where the tree leaves will move due to wind.This is called ghosting. In software like Photomatix you can select the area where ghosting takes place and the software will choose only one of the exposures to use for that particular area. If you are using Adobe Photoshop or Elements you can select the photograph which you want to appear in your final image and just create a layer mask.

Thursday, June 13, 2013

Enhancing A Landscape In Post-Production


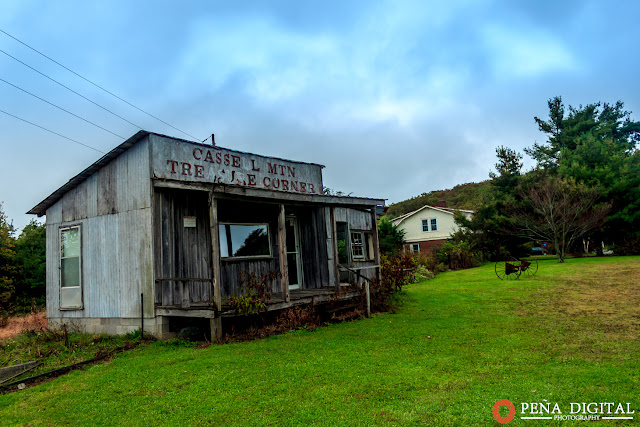
Sometimes composition is not easy. You may not be able to take a photograph of your subject during perfect lighting conditions. Such is the case during a family trip to the mountains of Virginia. I was only in the mountains for a brief period of time on a overcast and rainy day. The light reflected from the gray clouds made everything look dull. Nevertheless, I saw an interesting looking house that had potential, but there was no good angle to photograph it. There was a road with signs on the left and a house on the right that took away from the rustic look and feel.

Original image

STEP 1: Post-Production In Lightroom
I played around a bit with the photograph in Adobe Lightroom and was able to add more warm colors to the original image, as it was a RAW file. I even added some fake clouds in the sky. I liked what I saw, it was a big difference from where I had started. The colors now popped but I was still not satisfied.

Altered image in Adobe Lightroom

STEP 2: Finding And Adding Elements To The Photograph
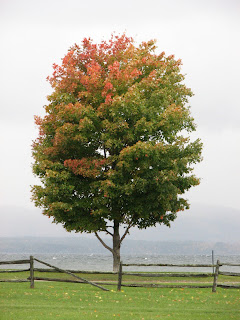
I found an image of two trees online that more or less resembled the trees during fall that I saw during the trip to the mountains. I extracted the trees from their background using Adobe Elements, but this could easily be done in other image editing software like Adobe Photoshop or if you prefer in GIMP which is free. I then  added the trees to the photograph to hide the white house in the background a little and the other one as a bush to hide the concrete foundation on the side. While I added only two tree to the final image, I did practice adding other kinds of trees.


Tree found online

STEP 3: Final Tweaks
Just small touch ups here and there to clean the picture. Removing the cables from the top of the house and the fence post from the side using the healing tool in Adobe Elements were a must. As well as getting the added trees adjusted in the right light.

Final image

Thursday, June 6, 2013

Selective Coloring Effect Using Lightroom


One of the simplest way to add a little spark to a photograph that is highly popular is the use of selective color in a black and white photograph. You may have seen it on wedding pictures where the bouquet of flowers held by the bride is the only object colored in the image.

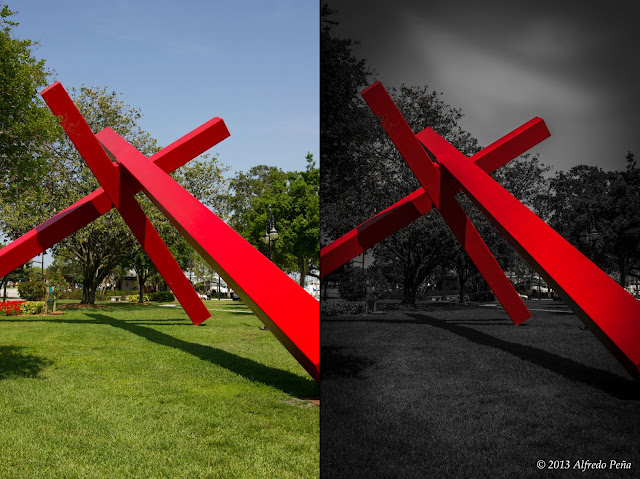
While there are countless of ways to achieve this type of effect, for this entry I will show you a quick and easy way to do it using Adobe Lightroom 4. The picture below shows the before and after the technique has been used and it only took a few minutes to achieve. The original image was shot at 28mm, 1/200 sec, F/8.0 and ISO 100.  I took this photograph while sightseeing in downtown St. Petersburg, Florida.
Lets get started..

Before and after picture of selective color example
Before and after pictures of selective color example

STEP 1: Lower Exposure Value
Open the image in Lightroom and under the Develop module select the Basic tab and lower the exposure to -2.0. I find that lowering the exposure for black and white images brings out drama in the photographs.

STEP 2: Add Vignetting
Vignetting is found in the Lens Correction tab. Adding vignetting will lead your viewers eyes to the center of the picture because it is lighter in  the center. I set mine to -33 for this photograph.

STEP 3: Change Saturation Levels
Select the HSL / Color / B&W tab. From there select Saturation. With the sliders you can adjust your image to display only the color you want. In this case I left the Red and Orange sliders alone, since those are the colors used in the beams, and the ones for Yellow, Green, Aqua, Blue, Purple and Magenta I set to -100.  After this step you are about 90% done. As you can see in the picture below there is red and orange colors in nearby bushes that I still had to remove.  

 Example photograph after first saturation sliders used


STEP 4: Use Adjustment Brush for Corrections
For removing the color in the bushes I used an adjustment brush. Select the Effect desired to be Saturation and set that to -100. Brush over the areas that contain colors that you do not want to show. If you make a mistake, select the eraser mode and brush over the area.

STEP 5: Use Adjustment Brush for Dogging and Burning 
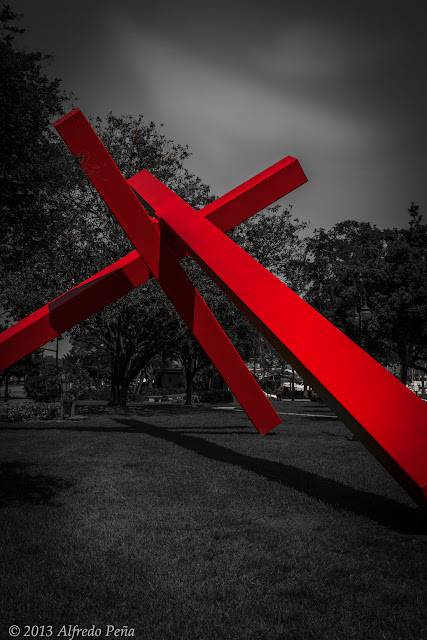
From the early days of photography dogging and burning has been used to add accent and adding pop to black and white images. Dogging and burning simply mean adding highlights and shadows to your pictures. In this case I added a little effect on the sky by setting an exposure of +.50 to an adjustment brush and making lines across the sky several times. Less noticeable, there is also some effects being applied to the grass in some areas and some of the trees.
Finished image without cropping

For taste, I cropped my picture into a square using a crop of 1:1. Here is the final image below.
Finished image after 1:1 crop

Saturday, June 1, 2013

Depth of Field


Depth of field is the portion of your image that is in focus. The field is the distance in front and behind your subject that is acceptably sharp and in focus and one of the most creative tools you can use as a photographer.

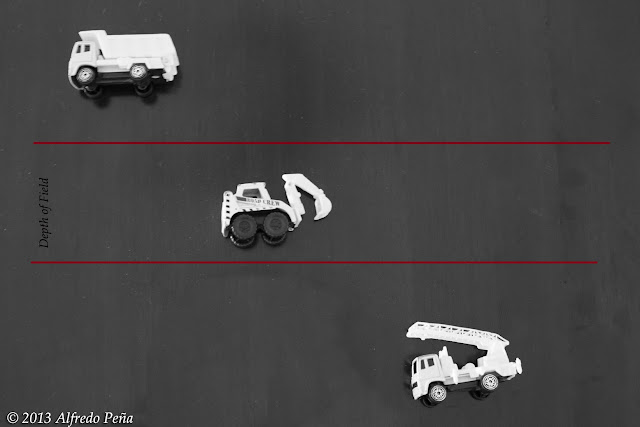
In the picture below the truck in the middle is the only thing sharp and in focus, inside the depth of field. Everything else, in front and behind, is outside the depth of field.

Example of Depth Of Field
The picture below shows the visual representation of the depth of field from the picture above.
Example of lines showing depth of field


Most photography beginners believe this is something complicated to understand and difficult to control. My hope is that after reading this entry you will have a better understanding as to how it works and that you will be able to apply it to your photographs.

A shallow depth of field is when your subject is in focus but the background is out of focus. Since our photographs are two dimensional, this is a way to create a three dimensional feel because you can see the subject forward in the image. You may have seen this effect in portrait photography.  Our eyes are naturally drawn to the sharpest objects when looking at an image. With this effect you are removing all distractions in the background, guiding your viewer's eyes to your subject. You let the viewer know what you, as the photographer, consider to be the main point of interest.

A deep depth of field, normally used when photographing landscapes, is when everything in the image, from the foreground to the background is in focus.

What influences depth of field in an image

The depth of field is influenced by three factors: Aperture, focal length and the distance you are from your subject. Lets look at each one of these closer.

Aperture

Having a large aperture (small f-stop value) will have an impact on depth of field. The smallest f-stop value you can set in your camera is determined by the lens you are using. You can set the aperture value in your camera using either Aperture Priority Mode (Av on Canon, A on Nikon) or Manual mode. Don't be afraid to venture into these modes. They will make your pictures look better. For more information on aperture check out my entry on the exposure triangle here.

Here is an example of photographs taken with a large aperture at f/2.8 and another one taken at f/11. As you can see all distractions have been remove in the one taken at f/2.8, while the one shot at f/11 is very distracting with everything in focus. The beach was just as crowded in the second picture. To learn more on aperture read my entry on exposure basics here.

F/11 - Small aperture
F/2.8 - Large aperture

Focal length

You can create a shallow depth of field with a longer focal length, such as the ones used in a telephoto lens. A telephoto lens compresses the background making your subject stand out from the background. Wide angle lenses expand the depth of an image creating a deep depth of field so it will be more difficult to create a shallow depth of field with a wide angle lens. To do so, you would need to stand very close to your subject. This is why wide angle lenses are most often used for landscapes, when you want everything in the image to be sharp and in focus.

Below are two photographs taken from the same distance of 10 feet. One using a wide angle focal length of 24mm and the other using a focal length of 70mm. You can see the distracting background in the picture shot at 24mm, showing a deep depth of field.
 
Example of Depth of field at 24mm
24mm
Below a more shallow depth of field using a 70mm focal length. As you can see the distractions in the background have been removed. After the about half the neck everything becomes blurry.
Example of Depth Of Field at 70mm
70mm
Distance from your subject

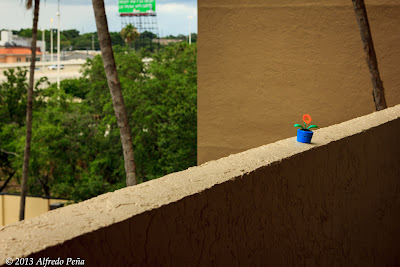
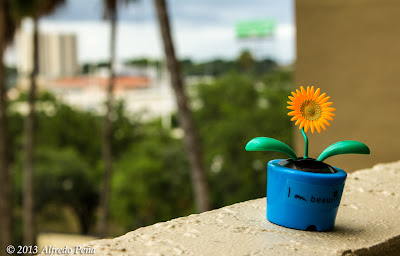
Your physical distance will have an impact on the depth of field. The closer you stand to your subject, the shallower the depth of field. Take a look at the following images for example.

Below are two photographs were the same camera settings were used,  aperture of f/5.6, focal length of 50mm and ISO set to 200. The only difference is that on was taken 10 feet away and the other from 3 feet away. As you can see the one shot from 3 feet away removes most of the distractions with a blurred background. Your eyes automatically focuses on the flower because it is the sharpest object in the frame.

Example of Depth of field at 10 feet away from object
10 feet away from flower, f/5.6, 50mm, ISO 200

Example of Depth of field at 3 feet from object
3 feet away from flower, f/5.6, 50mm, ISO 200

Recommendations
  1. When photographing people and want to create a shallow depth of field, use a wide aperture. Also make sure you focus on the eyes. If the eyes are blurred the picture will be no good. 
  2. When photographing landscapes and want everything in focus, use a high aperture value of f/8 or f/11. These are values where your lens will be most sharper.